When creating a Niche Website, with WordPress or another CMS, what you want is to help your user find various things on your site.
For example, my site here talks about getting an Internet Website Hosting Company. However, on that page, I warn my readers that when they are presented with the WordPress installation screens to actually make sure they choose their username wisely—there are other things to be careful about, but this one is a major problem, because the names “admin” and “administrator” are 100% compromised.
So what I did on my page about Hosting is put a link to my page about the WordPress installation screens. More specifically to the section where I talk about the selection of your username.
That kind of a link is called an Internal Link. This is considered a Search Engine Optimization (SEO) as well. Google is happy to find internal links. This means your various pages are somehow related and not a bunch of standalone pages.
Unfortunately, the default WordPress editor does not give you full control over Internal Links. It has, to my point of view, three problems which I discuss below:
At first, it was called Hyperlink. It was text which, when clicked, would send you to another page on a website. Links have evolved quite a bit since then. They can be text, pictures, you find them in videos, animations, PDF, Word documents. They are everywhere.
For a website, though, all links are created using the HTML anchor tags. This is the <a> tag. There are four parts in the anchor tag.
The opening tag (<a>)
The tag attribute (i.e. rel=”nofollow”)
The anchor text, which appears between the opening and the closing tag.
The closing tag (</a>)
Most tags have an opening and a closing tag and support a certain number of attributes. So learning how that works is not limited to the anchor tag.
There’s an example of a link with the nofollow relation attribute, which is often used when linking to a third party you do not want to vouch for, especially for an affiliate link:
<a href="http://amzn.to/some/path" rel="nofollow">
    This Beautiful Product
</a>
For best SEO, know that the anchor text, what appears between the <a> and </a> is what Google uses to index the content being linked by that specific anchor.
Technically, the “href” and “rel” are called attribute names.
The “http://amzn.to/some/path” and “nofollow” are the value of an attribute. In case of the “rel” attribute, it accepts multiple keywords called tokens.
Unfortunately, WordPress does not give us an easy way to edit all the possible attributes. There are plugins that help us, though. I use the Nofollow for external link plugin to add the rel=”nofollow” attribute. Also, WordPress adds the necessary rel=”noopener” when you require the link to open in a new tab. So in most cases, the right thing happens automatically for you.
Linking to the Same Page Multiple Times
When you have a link inside your page to, say, you Contact Page, you are likely to end up with at least two links to that contact page. One in your top menu and one on your page.
As far as SEO is concerned, this is just fine. Both can be regular links (i.e. no need for “nofollow” or any other attribute.) In terms of passing juice, it doesn’t increase just because you have duplicates, otherwise, it would be too easy to do Page Rank Sculpting. However, in terms of keywords, each set of words in each anchor counts toward indexing that page with those words.
So, for example, you could have links sending people to your contact page with anchor texts that look like this:
Contact Form
Contact Me
Contact Alex
Contact Internet Affiliate
Contact Alexis Wilke (probably a bit too formal with your full name.)
Contact Us (not so good on a Niche Website, it should be personalized.)
One reason I will add such Internal Links is on legal forms or if there are potential problems and my readers contacting me about such problems makes sense. So having those links there help. Which anchor text I will use will very much depend on how I wrote the paragraph that includes the link.
Note that I’m a proponent of the idea that you don’t need to have the exact same anchor text each time. Google and others are really good at understanding variations with the same meaning. For example, in the old days, some people would use such techniques to include a singular and a plural version of their anchor text. Today this is really useless. Apple and Apples mean pretty much the same when a search engine is concerned. Where you may have a difference is in a detail such as a color: His Red Ferrari and Her Pink Ferrari are certainly viewed as distinct long keywords.
WARNING: Except for pages defined in your menus, you do not want to have a link to the same page from all your other pages. This is a big no! no! since it is viewed as a black hat manipulation by Search Engines. So a Niche Website with 1,000 pages and a regular menu ends up with 999 pages linking back to your homepage, similarly, probably 999 pointing to your Disclaimer, Terms & Conditions, Privacy Policy, Blog, Contact Form, etc. Any page that appears in one of your menus. That makes sense. However, adding the same URL to all your pages in an attempt to boost that page will fail.
Note: if you wanted to create an ad for your own website which includes a link back to a certain page, that’s okay too as long as that does not appear in the main content of the Nice Website. If unsure, though, you may want to add a rel=”nofollow” in the anchor tag.
Although the editor accepts local links if you give them to it, you have to think of creating those local links as local links yourself. This has always been a problem in WordPress.
A Full URL for my website will start with the protocol (https) and the domain name (www.internetaffiliate.com), then it generally ends with a path. If I want the user to be sent to a specific section, then I can add an anchor (see Links to Sections below).
One annoyance with Full URLs is that it takes more space. This is not a huge problem, though, since we have larger computer storage and faster bandwidth. Yet, there is really no need to send millions of characters to millions of people every single day when not required.
So, what I try to remember doing is delete the protocol and domain name. You just have to keep the first slash, then the full path and if present the anchor (the # character and what comes after that.)
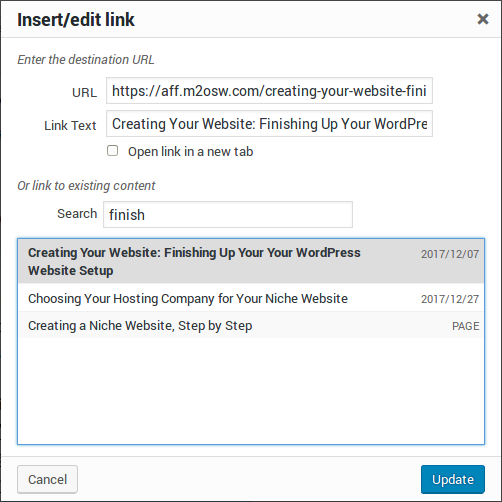
So by default WordPress generates a link that looks like this:
There is a screenshot of the link editor. When you click on a page because you want to link to it, you will see that the link includes the https:// and the domain name even though this is an Internal Link to one of your pages.
Instead, the link should look like this (i.e. just a path), including the slashes:
/seo-internal-links/
As far as browsers are concerns, it becomes the same thing.
Now imagine that you optimize all your links like that and each month you get about 1 million hits, that’s a saving of 21 characters (in my case) so 21 Mb of data PER LINK PER MONTH. I know there is compression to take into account and it is likely dividing that amount by half. Still. That’s a lot of bandwidth wasted right there. For that reason, I suggest you install an HTML Minifier Plugin (click to see details about a Minifier I suggest you use,) which automatically takes care of that for you.
Also, the other problem with this WordPress technique is when you want to change your domain. It’s not straightforward. You will have to run a Plugin to fix all the Full URLs to the new domain name.
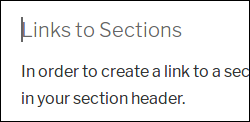
Links to Sections
In order to create a link to a section, you need to create what is called an anchor in your section header.
I show you the code so you know how an anchor looks like, then the next section tells you which plugin to install and use to create those anchors and how to create links to them.
Using Code
Unfortunately, the default WordPress editor does not include a WYSIWYG (What You See Is What You Get) feature that lets you add an anchor without you going to the HTML code. So you have to click the Text tag, found at the top right of the editor window, and then editing the code manually.
There are two main ways to create an anchor. You either add an anchor tag like so (choose one or the other):
<h2><a name="my-section"></a>Section Title Here</h2>
<h2><a id="my-section"></a>Section Title Here</h2>
When using the anchor tag, you will see a little anchor appearing. That gives you the ability to move it or delete it. Also having a visual signal that the tag exists, I think, is a good thing.
Or you use the id attribute on the header tag like so:
<h2 id="my-section">Section Title Here</h2>
The id attribute is invisible even in the editor.
So this is the very light way since you do not have to add yet another plugin.
However, for best usability (and thus best SEO as far as Google is concerned), it is a lot better to have an anchor on each section of your post, because that way Google can actually send its users to a specific section of your page if it deems that section to be more appropriate as the answer to their search. So I suggest you install an anchor plugin instead, which is the subject of the next section.
Using a Plugin
I tried a few and the one which I think is enough and works as expected is Easy Smooth Scroll Links.
This plugin adds a little Anchor button to your editor toolbar which is shown in a red square in this screenshot:
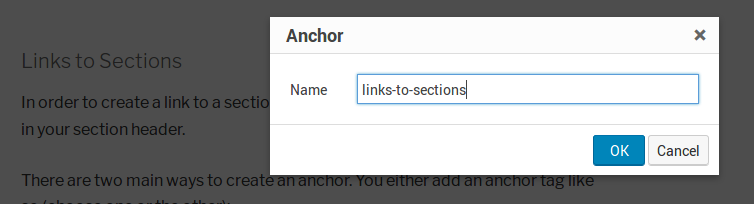
So first I suggest you click on the left side of your section title. There is how I did it for this section:
Then click that new button in your editor toolbar. That presents a popup window where you can type the title all in lowercase with dashes instead of spaces between words, like so:
Finally, click OK.
Side Note: The anchor name is whatever you want, my suggestion makes it easy to know what it is without having to edit the anchor each time.
IMPORTANT NOTE: Here you do not enter a “#”. If you do so, the anchor won’t work since an anchor reference can’t include a “#” character (since it is the introduction character of the anchor in a URL). Unfortunately, the plugin does not remove it if you make the mistake of adding it, which I bet quite a few people do.
An Important Setting
Note that the Easy Smooth Scroll Links has a setting named Offset. This should be set to 74 when you use the Twenty Seventeen theme. This is because the theme keeps your menu at the top and the height of that section is 74 pixels.
If you do not set that option properly, then those internal links are going to place the section title under the menu which makes it quite a bit off. You may use 94 instead of 74 to put a little space between the menu and the section title. Test and see what you like best.
Select The Right Scroll Animation
By default, the scroll animation is set to the first entry which is easeInOutBounce. That’s super bouncy and really not pleasant. It scrolls all the way up, bounces, and then goes to your anchor. Frankly, unless you have a really funky website, that option is not of any use to you, I think.
Instead, change the option to easeInOutSine. That will give you a straightforward scroll from your current location to the anchor. Much better. If you’d like to test on my website here, I have many such anchor links on the same page in my Glossary of Internet Affiliate Terms.
Creating the Link to an Anchor
Once a section has such an anchor, you can create a link and add that anchor at the end of the link.
There is how an internal link sending people to that specific section looks like:
/seo-internal-links/#links-to-sections
As mentioned before, the link can include the protocol (https) and the domain name, but those are a waste.
Now, there is the link to the very beginning of this section: Links to Sections so that way you can test how that works.
Also, if you are linking to an anchor on the same page, you do not need to include the path at all. In that case, the link becomes even simpler as follow:
#links-to-sections
These can be useful to directly send your users to various sections like a Summary Box would do. For example, in the Creating Your Website: Installing WordPress post I have two parts:
Part I — how to install WordPress on your very own server or a host that does not automatically install WordPress for you; and
Part II — settings once you are in the WordPress installation wizard.
I put a link at the top of the page so people who chose a hosting company that automatically installs WordPress, such as BlueHost (for which I’m an affiliate), can directly go to the second section since the first is taken care of by the host as they prepare your account!
Ah, But The Section Title Disappear
As I mentioned above, for anchor links within the same page, you have to edit the Easy Smooth Scroll Links settings and make sure the Offset is set to at least 74 (assuming you are using the default 2017 theme.) Otherwise, your title will be hidden under the menu that sticks at the top of the page whether you scrolled to the very bottom or are at the top of your page.
That plugin properly handles scrolling when you click a link on the page. However, if you click the link on another page and it opens that new page, it totally ignores the fact that the page is being accessed with an anchor. The problem also shows when you hit the Reload button of your browser. The section title ends up under the menu.
I wrote a little JavaScript to fix the problem. You can include it on your website by editing the Theme Header. This is found under:
Appearance » Editor
By default, the editor loads the CSS file which is what most people will tweak in WordPress. However, what we want to edit here is the Theme Header. Depending on your configuration, it may be somewhere else, but by default, there should be links on the right side of the screen with various names. In my case I have:
The first line includes a jQuery extension that handles smooth animations. The second line includes my tiny script that will properly scroll to the specified anchor. Specifically, it makes sure to apply the correct offset otherwise the title gets hidden.
Make sure to click the Update File button after you copied these two lines in the header.php file. To test, you will want to have a link to a path and that ends with #some-anchor on one page and such a named anchor on the destination page. Remember that my code only kicks in when you click on anchor between pages and the plugin extension handles the problem within your page.
Select an Existing Anchor
Unfortunately, the link popup from the editor does not give you a list of existing anchors so instead you have to type it in.
Not only that, you have to make sure that you enter the ‘#’ character or it won’t work. Without the hash (#) It will instead try to go to a page with the name of that anchor, and that page probably does not exist.
For that reason, whenever you create anchors, I strongly suggest that you test them all.
Automatically Verifying Your Links
A solution to not being the best at entering links manually is to install the Broken Link Checker plugin. This plugin will automatically check all your posts and comments (and other parts too) for links. All those links are added to a table and once in a while (every 72 hours by default) they are checked to see whether they are broken or not.
Note that I changed that setting to 168 hours, that’s once per week. I think that’s more than enough for a little website. Once your site is done, the links are not likely to break often.
VERY IMPORTANT: You must make sure that your Affiliate Links to Amazon.com (and possibly other affiliate programs) are not being checked by a robot. This includes the Broken Link Checker plugin. In the settings, you can include a list of domains to avoid checking and you must include the amzn.to domain (if you do not use the shortener, make sure to also block the amazon.com domain.)
Go to Settings » Link Checker and then click on the Which Links to Check tab at the top. There you find a box named Exclusion list. Enter the amzn.to domain name in that list and make sure to click Save Changes.
The four steps to exclude a domain from being checked by the Broken Links robot.
Note that your Google Rank actually depends on your links not being all broken. In other words, making sure that your links remain valid is an important on-site SEO task along having internal links and anchors. Google won’t penalize you for one broken link. However, if they find many broken links, you will start seeing side effects (a.k.a. less traffic) which you do not want.
This module will actually send you an email to let you know that some links are broken. That way you can fix them quickly. At times you will get false positive (i.e. a site down for a day or two…) but in most cases, this is preferable to really having broken links that you have to take care of and making Google unhappy and losing many organic clicks.
Leave a Reply
We use cookies to ensure that we give you the best experience on our website. If you continue to use this site we will assume that you are happy with it.