
As an Internet Affiliate, you are always on the lookout (at least I think you should be) and once in a while, you will want to change your Domain Name. This can be useful if your first choice was not available when you first created your Niche Website and it becomes available later at a decent price. Especially, since at first you are going to earn peanuts (when you create your first website,) you want to look into getting a cheap dot-com and not attempt to purchase an expensive domain name (hundreds if not thousands of dollars) unless you have that kind of money to start with. Note that, as I recommend, you decided to use Bluehost, then you get the dot-com included with your hosting. No extra cost to it. But you still want to not look at a premium domain name. Also please stick to a dot-com. Other extensions are fun and all but it’s difficult to get people to go to such websites. All large websites use a dot-com at the moment.My advice is as follow: get a first dot-com that you like enough and go with it until you start seeing some income. At that point, be on the lookout if you think that there is a better name out there for your website. Until then, it would most certainly be a waste of time.
If you don’t feel comfortable doing such a transfer on your own, I can do it for you. Contact me through my company, Made to Order Software, and we’ll look into that together. You should already have your new domain name when you contact me, so we can immediately work on the transfer.
Now, there are eight steps in getting your website moved to your new domain name.
Step 1. Acquiring your New Website Domain Name
So, you have a domain name that is okay, but you found a better one. Now what?
First, acquire the new domain name. If it is available, just purchase it from your existing domain name registrar. If it is a premium domain, as it is called, then you will have to purchase it from the existing owner. This can take some time and I want you to go to completion of this process before you do anything else. While waiting, don’t hesitate to add one or two more pages to your website. It won’t hurt.
In many cases, a premium domain can be acquired directly from the owner. Be careful in that case because if you just send money to someone, there is probably no real incentives for that someone to surrender the domain name to your after that. One way to avoid problems in such transactions is to use an escrow company. Escrow means a third party person or company, but in our case, we will consider that it is a company, which takes your main and waits for the domain name to be transferred. Once the domain name was transferred, they release the funds to the old owner. The old owner is protected since the money is with the escrow when he transfers the domain name to you and you are protected because the funds are held by the escrow company until you confirm that you received the domain name.
Premium Domain Purchase and Transfer
Here are the general steps of a premium domain name process:
- Find your new Domain Name
- Ask the current owner whether he would agree with selling his Domain Name
- Agree on a Price for the Domain Name
- Register with the Escrow Company
- Start a Domain Name Transfer, including the name of the domain to be transferred (some Escrow Companies allow for multiple domains to be transferred in one go)
- As the buyer, you send the money to the Escrow Company which holds it in an Escrow Account; in most cases, you are responsible for all the fees, so expect to have to pay the Escrow Company fees at this point (it varies, it could be between 1% and 10%)
- As the seller, you are notified that the Escrow Company has the funds and is willing to transfer them to you once the goods were transferred
- The Seller starts the Transfer Process, in most cases the seller asks its registrar for a code and gives that code to the Buyer
- The Buyer receives the code from the seller and starts a transfer process with their registrar, enters the code and (usually) pays for an additional year to hold the domain name with the new registrar; the time remaining with the old registrar will also be added to the total amount of time you will have your domain name
- Once the code was entered by the Buyer, the registrar sends an email to the seller (this is an automatic process); this is a verification process to make sure that the seller did indeed intend to sell his domain name
- The Seller receives an email and needs to go to his registrar account and accept the transfer; this is the final step for the actual Domain Name transfer, however, there are two more steps for the buyer at this point
- The Buyer should receive an email, although checking your account with your registrar once or twice a day is not a bad idea while waiting for a new domain name—once you received the notification or see that the domain name was transferred, edit the information on the domain to make sure it matches your information; make sure you can get your DNS to work as expected, at that point you can say that it is yours, if you are on the same system and are using the same DNS as your seller, make sure that you get the correct IP address when checking your new domain name
- Go back to the Escrow company and mark the domain name transfer as done, the Escrow Company is now ready to release your funds to the Seller!
An Important Premium Domain Drawback
When you’re considering the purchase of a premium domain, I strongly suggest you do a little research about it, although certain things will not be possible to determine with 100% accuracy, it’s a good idea because you could be purchasing a domain name strongly marked as being web-spam.
The one method I know of which works pretty well is to use the MOZ toolbar.
Important Note: The toolbar currently only works in Chrome.
Once installed, go to the domain name you are interested to purchase and look at the Spam Score. If it is more than 4, know that you will have work to do to make sure that you don’t get penalized because you are using that domain name. There are going to be two things you will want to do:
- Disavow the external links from all the spam websites linking to that page (you can find those in the Google Search console once you own the website)
- Contact those external website owners and ask them to remove said links (this may or may not happen, for www.internetaffiliate.com it happened relatively quickly for about 50% of the links. I’ve done it even though the MOZ bar spam score was just 4, the Google Search Console gave me about 12 domain names with back links, 3 of which were fine… 9 on which I had to do work!)
I will have to write a separate post about this process since it can happen to anyone and it is a lot to do!
Now, if the Spam Score is very low (0 to 4) then your new domain will work pretty much as is. A score of 0 would be best, of course (i.e. not backlink representing spam.)
Step 2: Prepare Your Website for the New Domain Name
Before you transfer your WordPress website, you want to go through a few important steps to get it ready.
Although some of these steps are optional, I strongly advise that you check them out before you get started to make sure you do or do not need to act on them.
Action A. Make a Backup
You are about to do many changes to your website, so having a backup, just in case, is of utmost importance.
I have a page about your website Security and specifically, about Protecting Your Data, which explains how to run a backup process of your WordPress website and especially making sure that the data is saved and secure on a third party system such as Dropbox. Please follow these steps if you are not yet familiar with how to create a backup. The transfer process, in a way, is going to create a backup but I will feel more at ease if you would please do a backup…
Action B. Turn Off Simple Google ReCAPTCHA and Other Login Protection Plugins
You should have the Simple Google ReCAPTCHA, a.k.a. “I’m not a Robot”, installed if you followed my instructions.
The ReCAPTCHA security comes in part from your Domain Name. That is, whenever Google checks what your form is valid, it includes your Domain Name in the check. So when you transfer a website from one domain name to another, it will fail if you do not update the keys. You will update the keys once you have the website on your new domain. While doing the transfer, though, just Deactivate the plugin.
To do so, go to your Plugins menu and search for Simple Google ReCAPTCHA. It should look like this:

Once there, click on the Deactivate link. You will notice that the blue line on the left side disappear once the plugin is deactivated.

As you can see, also, the Activate and Delete links appear. Once you are done with the transfer, you will want to click the Activate link to re-activate the plugin. At that point, you will change the keys and you will be good to go.
Step 3. Get a Payload of Your Existing Website
Now I suggest you install the Duplicator Plugin in order to generate a payload with your existing (a.k.a. old) website.
The process should be pretty straightforward. Go to Plugins » Add New, enter Duplicator in the search box at the top-right, click on Install and Active.
A new menu appears in your administration screen named Duplicator.
On the current version, there is an option at the top-right that says “Create New”. You will have to click on that button to create a new payload (they call it a package).
The first step of the process is a verification step that ensures that you’ve got all the correct PHP capabilities to perform the duplication. In my case, for example, I did not have PHP ZipArchiver installed. I had to do that first and then the Duplicator accepted to move forward. Otherwise, the Next button will be grayed out.
There is the command I ran on my Ubuntu Linux system. Hopefully, you won’t have to do that at all. With a service such as Bluehost, you will already have all you need pre-installed.
sudo apt-get install php7.0-zip
The process should just be a few clicks. Nothing to change in the parameters. If you think there is a need, check the Duplicator documentation. Personally, I did not have to do anything other than click, click, click, done!
Step 4. Retrieve the Payload
Once the Duplicator is done with your old website, it will offer you to download two files. One is a large Zip archive with your database and all your website files. The other is the installer.php script.
The installer.php script will do all the work of extracting your archive on your new system and installing the database. This is pretty easy. Your main concern will be to make sure that it can access the database. They have a check in the PHP and as long as you see it, it means that the database is not quite ready for the transfer.
Download them both to your computer.
Step 5. Installing the Payload on the New Website
I will assume that you created a new environment for your new website. That means you have an empty folder where you are ready to add HTML files such as an index.html.
Note 1: You can also get a new hosting plan with WordPress pre-installed, that’s fine too. It will work, only that new installation of WordPress will be mostly overwritten with the payload of your old website.
Note 2: If you get a new hosting plan, the 301-redirect is going to cost you more than it should. If you’re not too sure how to handle that, check with your hosting provider. You should not have to pay anything to get a 301 other than the domain name you 301 from.
In that folder, install the large .zip and the installer.php files. Both will be at the top. To test that this process worked, go to your new domain and add installer.php at the end like this:
https://www.example.com/installer.php
This shows you a screen with various fields to enter your database username and password. The installer also checks that the .zip file is present and has the correct size (i.e. the installer was created when you created your payload and that means it could be given the exact size of the corresponding .zip file.)
Before you attempt the installation, I strongly suggest you click the Check Database button until it works for you. As long as there is an error, it will show some information about the database.
You will need a username and a password. The default connection uses the default port number and localhost. If your database is on a remote system, enter that system domain name or IP address, whatever works with your systems. Note that normally only larger websites need to bother with remote database installation to allow for more traffic. However, some Internet Hosts provide such setups from the get-go—because they put many of their users on one database that is shared (your data is not accessible by others, but only one cluster is running for many users.)
On my end, I directly access MySQL on my system. I ran a couple of commands to create a new database and then allow my user to access that new database:
CREATE DATABASE mydb;
GRANT ALL ON mydb.* TO 'myuser'@'localhost';
Obviously, you want to replace “mydb” and “myuser” with your own information. Also, if you use a remote database the “localhost” needs to be replaced with the correct name or IP address. If you are creating the database on a new system, you may need to create the “myuser” as well.
Once the database access is all good, click on the Install button and the installation process will start as expected. This may take a little time.
Once done, the process tells you so and offers you to delete the installation files. You may want to test your website first and see that it works before you delete those files. However, know that keeping that installation.php file on your site is not a good idea (it can be a security issue.)
Step 6. Fix Your New Installation
Although the Duplicator plugin helps you smooth out the transfer and it really is absolutely fantastic, there are still a few steps that you have to do manually to finish up your transfer.
My points below suppose that you followed my installation recommendations. If you installed other yet other plugins, you may need additional steps to fix those too. You will have to test and make sure that those plugins do what you expect them to do.
Fix Your Google ReCAPTCHA Plugin
After you can log in your new website, you may notice that the Login Screen did not have the “I’m not a Robot” widget. This is because we disabled that plugin before doing the transfer.
You need to request a new set of keys from Google ReCAPTCHA.
Then to re-enable, go to the Plugins page, search for the plugin (Simple Google ReCAPTCHA if you installed the one I recommend,) click on Activate, go to the plugin settings, and copy your new keys in the form.
Finally check the Login Screen again.
WARNING: I strongly suggest that you use a different browser or a different computer or device to run that test so you don’t have to log out from the one you used to log in your new website. This is a good idea in case there is still a problem. Because if you log out and then try to log back in and somehow there is a problem doing so, you’re going to be locked out and will have to call me to get help and it will cost you extra… We don’t want that, do we?!
Note that you can log in from a different browser or even your cell phone and it will work. By default, WordPress does not prevent you from login in the same account from any number of devices and browser.
Fix Your Contact Form
If you turned off this feature, skip this section.
Your Contact Form should have a ReCAPTCHA, the “I’m not a Robot” widget, which will fail at this point because the domain name has changed. This is the same change as with the Simple Google ReCAPTCHA change, only in a different location because the Contact Form uses its own set of parameters to generate the widget on the form.
Look under Contact » Integration and you will see the form where you can enter the new keys. Click on the Reset keys button and update the Site Key and Secret Key (copy/paste for your ReCAPTCHA account) and finally click Save.
Test the Contact Form again to make sure you get the ReCAPTCHA and send yourself a message to make sure it can actually be used.
Redirect Your Old Site to the New Site
Once you can see that the new site is working alright (see Test! Test! Test! below as well) then you are ready to implement the 301 redirect from the old site.
Unless you know of a better feature to do the 301, I suggest you do it in your .htaccess file (if you have direct access to the Apache2 .conf files, then do it there instead.) This file has Apache2 commands and adding a redirect is very simple. Two lines of code like this:
RewriteEngine On
RewriteRule (.*) https://www.example.com%{REQUEST_URI}
Make sure to replace the www.example.com with your new domain name. IMPORTANT: this goes in the .htaccess file found on your old website top folder. The “www” part is not required if you do not want it, then do not include it.
Changes to your .htaccess file take immediate effect so as soon as you updated the file you can test and see that the redirect happens. With the %{REQUEST_URI} variable, it will redirect links to your sub-pages just as well as your homepage.
If you are using sFTP to access your files on your old website, you can use the free FileZilla tool (Note that the installer is not unlikely to attempt to install a sponsored application such as an anti-virus. If you don’t want that, make sure to select/unselect all the checkboxes as required.) It has an Edit feature so you do not need to download, edit, upload. That is, FileZilla takes care of the download and uploads for you.
You should then keep that old domain name for some time, I would suggest at least 12 months. You may also keep it forever. After all, some of those links to your page will never die out. So if you keep the old domain name forever, you will continue to benefit from those old links. On the other hand, in business, we use what is called Return On Investment (ROI) and the cost of keeping the old domain may be higher than the benefits it generates. It’s often hard to calculate that one, though. You’d have to see how many people follow those link(s) and whether the page(s) they appear on are worth something. If so, then keeping it is not unlikely an advantage. I’ve seen really large companies keep old domain names for ages. For example, I worked for a company named Serious Magic. Their domain name was seriousmagic dot com. It was bought by Adobe and that domain name is still owned by Adobe and it still redirects you to their website (even though after a few years the Serious Magic products were all discontinued.)
Another thing you can do with the old domain name is put it for sale. You should not do that immediately, but after like 6 to 12 months. Once things have settled and the new domain has links instead of just the old one. Although we see domain names sold for $1M or more, your domain is not going to go for that much, I would imagine. But you could still recoup some of your costs by selling it for $200 or more. Someone else may think it is a great domain.
Fix Your Google Search Console Setup
You may remember creating a Google Search Console account and adding your website domain name there. Now that you changed the URL of your website and made the old domain 301 to your new domain, you want to switch your Google Search Console property to the new URL.
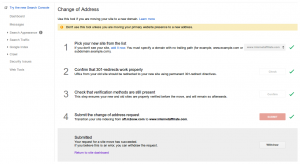
Whenever you go to a domain to the Google Search Console, you get a menu at the top-right corner of that property. One of the options in that menu is “Change of Address”. When you select that option, you see a page that looks like my screenshot here. Notice how the page includes various verification steps. Those are going to be run by Google Search Console and a green checkmark added for each that works as expected.
Some of these will sound weird, but here are the steps to follow to apply the Change of Address:
- Add your new property to the Google Search Console
- Make sure your new property is properly verified (this should work as is if you had the Google file because it will be transferred along with all the other files)
- Go to your Old Property Console
- Click on the menu at the top-right
- Click on “Change of Address”
- In the first option, select the new property (it is likely going to already be selected)
- Click the Check button by the 301-redirect line, unless it fails, move on
- Click the Check button by the verification method still present, unless it fails, move on
- Click Submit, if it asks you to confirm do so
That’s it. The advantage of doing it this way is that the Google Search Console will know to transfer the data it had on the old property to the new property so you do not lose your history. If you do not care much about the history, creating the new property and deleting the old one is enough.
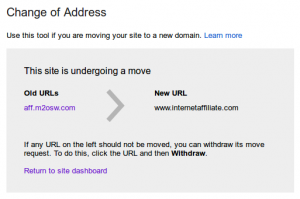
Once the Google Search Console accepted your Change of Address, the old property shows a screen that looks like the first image I’ve shown in this section. The new property, however, shows the following under its own Change of Address page.
I like this one better because it clearly shows the old and new URLs and with an arrow in the middle, it really makes it clear that this is becoming that. It is also a good way to verify that you did not mess up. If the URL on the left is your new property, you need to withdraw the change and try again in the right direction (i.e. go to your Old Property and select Change of Address there, then at the top-right of the form, choose the New Property.)
Time to Complete Transfer
The Change of Address action takes time. The amount of time is not disclosed by Google. It is said that it can take as long as 180 days (6 months). That’s a long time to keep testing to know whether the transfer worked as expected. However, this means you should keep the old domain name for at least that long to make sure that you do not lose any of the hits on the old domain. Just make sure that the transfer is shown as done in your Search Console before you drop the old name. Also, a dot-com costs like $20 so frankly it’s not much to pay for many clicks.
How long has it been?
If you’re like most people, you probably forgot to write down when you started the transfer. There isn’t a clear way to know that on the Google Console, although they do record when the new domain name got verified, assuming you did not have to do that multiple times, then that date is your start date and Google shows you the number of days, months, years…
To get there:
- Make sure to go to the old Google Console (for now);
- Select the new domain name property;
- From there, click on the wheel at the top-right;
- In that dropdown menu, search for Verification Details;
- That page shows you when the verification was setup.
I hope this helps a few people out there!
Fix Your Google Analytics Setup
Google Analytics is more straightforward to update than the Google Search Console.
Go to your account and select your old website.
 In the newer interface, the Administration area is accessible by clicking on the wheel at the bottom-left (shown in that screenshot.)
You should then get a form of columned administration menu. If you are managing multiple properties, check that the top-left of your screen to make sure that the correct domain was selected.
One of the menu items will be Property Settings. Click on it.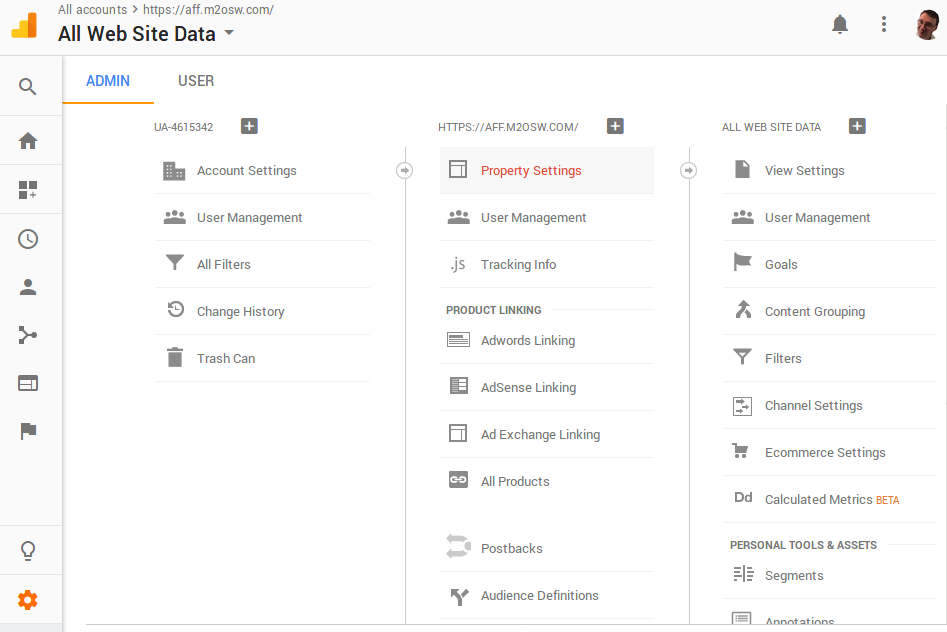 Now you end up in your Property Settings and you can edit the domain name to switch to your new domain. Here I show a screenshot of the old domain name I used for this website:
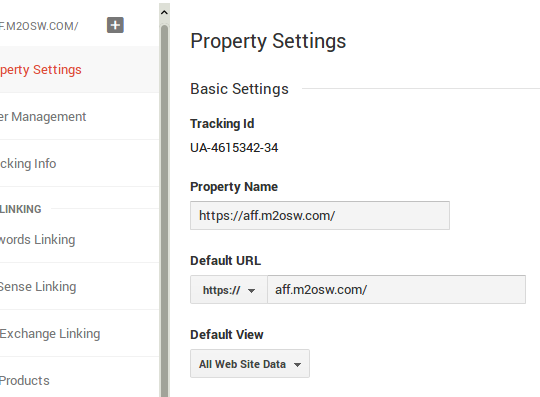
Now I just edited the “aff.m2osw” part and changed it with “www.internetaffiliate”, scrolled down to click on the Save button, and voilà! I have the new property defined and the old data stays around as expected.
The data will still be there. However, the interface may still show the old URL. Close your Google Analytics tab(s) and reopen. Now it should display everything with the new name.
Remove Duplicator
As I mentioned in various places, having plugins that you do not use slow down your website for no reason. I strongly advise that you disable them.
In case of the Duplicator plugin, once you are done with it, you can as well deactivate and delete it. You could use it as a way to create backups, but I think you’d have to do that manually…
Step 7. Backup Your New Website
Do a backup of your new website!
Yes. You made a backup before you created the new website and you’re happy it all worked like a charm. However, now you have a new website without a backup, right?
So the best option at this point is to look into creating a new backup. It should work just like that. Just click on the Backup Now button.
Step 8. Test, Test, Test!
Okay, so it worked, it seems, at least.
Now is the test period. You want to check all your pages as a user. That means go to a browser where you are not logged in your WordPress website and navigate to all your pages and make sure they look as expected.
A full test means that you click on all the links on each page to make sure that they all are functional. This means:
- Search for the first link
- Click the Link
- Click Back (the navigate back button or Alt-Left Arrow on some browsers)
- Search for the next Link
- Click the Link
- Click Back
- etc.
(Note that common links, those that appear on all pages do not need to be tested more than once.)
If you already have affiliate links (which you should since you just used money that you made with this very Niche Website of yours to purchase your new domain name, right?) then you want to test them too. Amazon says you are not supposed to use your own affiliate links, but I never had problems testing. Just try not to purchase anything for 48 hours after your test that way you are even more sure they won’t come back at you on that one. Or test on a browser you are not likely to use to make an Amazon.com purchase.
Note that all those affiliate links should look right when you hover over them with your mouse. Your browser should show them in your status bar. For example, the Amazon links are expected to be
http://amzn.to/<some-path>
You should still see that. A quick check won’t hurt.