One thing that Google helps you with is to optimize your website. Some of the optimizations that they ask you to do are not all good ideas, especially placing your CSS at the bottom of your page. If you do that, your page will appear broken until the CSS loads and I think that’s not a desirable effect (although if your page looked like the background only until the CSS loads, it would probably be okay.)
Testing with Google Speed Test
Google offers website developers a way to test their CMS output. This way they have a chance to optimize their results and get it to work much better as in being faster and function well on both Desktops and Smartphones.
The Google website is called PageSpeed Insights.
Go to the page and enter one of your Niche Website URL. It can be the URL to any one page. The test will run against that specific page.
The results show you what can be improved as per Google Insights. As I mentioned above, there are some optimizations that I do not recommend because they tend to visually break your pages.
Minify HTML, JavaScript, CSS
By default, WordPress does not minify anything. Google is going to tell you that it is a good idea and show you how much bandwidth you can save as a percent of what you are currently using. For example, they may let you know that by minifying you could reduce the size by 20%. That’s 20% less bandwidth!
Although I generally recommend to not add too many plugins on your website, adding one that will reduce the size of your data before sending that data over to your client is a great idea because a transfer on the Internet is pretty much always going to be much slower than compacting your data before sending it. There is a small additional latency which increases the gain, especially for people with slower Internet connections.
For the job, I suggest you use the Minify HTML Plugin. Please be careful as there is a small gotcha that can break some links on your website. Once installed and activated, you can access the Settings section (Settings » Minify HTML). There you will find an option named as follow:
Remove relative domain from internal URLs: Yes No
Make sure to keep the default (No) because otherwise, it will break your canonical link, which is very important to Google:
<!-- correct, when you selected "No" -->
<link rel="canonical"
      href="https://www.internetaffiliate.com/seo-optimize-your-niche-website-pages"/>

<!-- incorrect when you use "Yes" -->
<link rel="canonical"
      href="/seo-optimize-your-niche-website-pages"/>
There is a way to avoid the minify from happening, but it’s not easy to get it to work without editing your WordPress code, so I don’t recommend it. That additional optimization is great, but not worth the possibility of messing up your Canonical URL.
Removing the scheme (the HTTP or HTTPS part of the URL) is also a great optimization, but unfortunately, we get a similar problem with the canonical URL. So again I advise that you don’t change this option and keep it to No.
Remove schemes (HTTP: and HTTPS:) from all URLs: Yes No
Generally speaking, keeping the Minify HTML Plugin default settings is probably the best you can do.
Image Sizes
Many people don’t realize that adding very large images to a website can have very negative side effects. The fact is that once you uploaded and viewed it once, the image will be in your browser’s cache. That gives you the impression that the image loads very quickly, when in fact it’s already on your computer. In other words, you don’t even use your Internet connection to load your pages since as you build them your browser caches more and more elements from that page.
There are two ways of testing such:
- Clear your cache and then do a Reload of the page
- Use another browser to test the finished page
Clearing your cache often is annoying, especially because it clears the cache for all the websites you use. There may be a way to delete your cache for only one website, but I haven’t seen that feature yet.
What I do is use another browser to check my web pages. Clearing my entire cache on that other browser doesn’t bother me at all because I don’t use it on a daily basis for my work.
When I clear my cache I lose all my history which is very valuable in my work (i.e. when I start typing a URL in my location bar, I often select one of the URLs shown in the dropdown. That dropdown is filled up with my navigation history.)
Once you see the speed at which a page loads in a clean browser, you can see whether some images would require optimization. Large images load slowly (really, they take more time to load, they are not any slower in terms of transfer speed with your existing Internet connection.)
For a simple Niche Website, a site that is not directly related to actual graphics in some way such as a photography or art website, should make use of much smaller images wherever possible.
There are three types of parameters when we are talking about images:
- The file size
- The dimensions
- The pixel density
What needs to be dearly reduced is the first one. A file size of 64Kb or less is really good, but rarely achievable with full-color photos, even if not at the best level of quality.
The density is actually not directly important to us. It is very important in Print. So if you want to print an image of high quality on your color printer, you should get images around 600 dpi. If you have an older or not so powerful printer, 300 dpi will generally be very good too. In terms of monitors, older ones supported just 72 dpi. 4K monitors, which are starting to be quite popular in 2018, support about 120 dpi (32″) to 250 dpi (21″). Some smartphones also support 450 dpi.
Now, what I’ve seen and what will still work for the next 2 or 3 years, are pages with images of about 900 pixels in width. In 72 dpi (2K or 1080p monitors—1980×1080), this covers about 1/3rd of the screen.
So the simplest for you is to find a tool you like, such as the Gimp (an Open Source tool to work on photos,) and load your images once, resize them to 900 pixels in width, save them to your hard drive, and upload the smaller image on your Niche Website. The following are the steps of how I do this for my own websites:
- Find an image
- Download the image to a folder specific to your website (i.e. My Documents\My Niche Websites\Internet Affiliate Website\Cute Butterfly.png)
- Open the Image in the Gimp
- Go to Image » Scale Image …
- Change the size to Pixels if not already set up that way
- Make sure you have the height changed accordingly so you do not change the image ratio
- Click the Resize button
- Now click File » Export As … to save that back to a JPEG or PNG
¹ In case of a tool like InkScape, the Export as PNG feature allows you to save the image with the size you are interested in, so there is no need to use the Gimp later to resize the image.
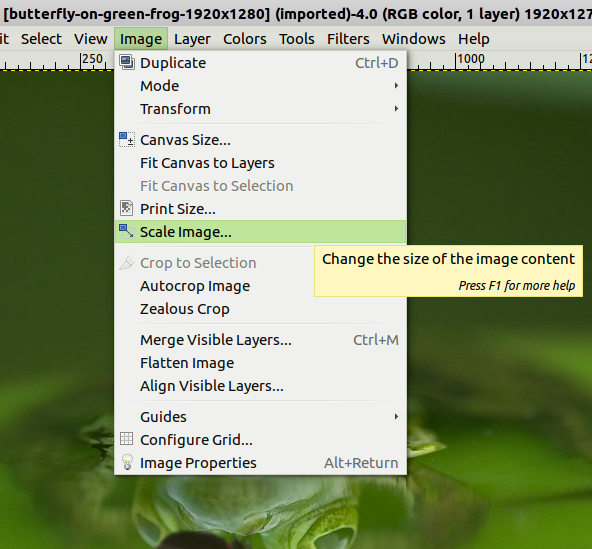
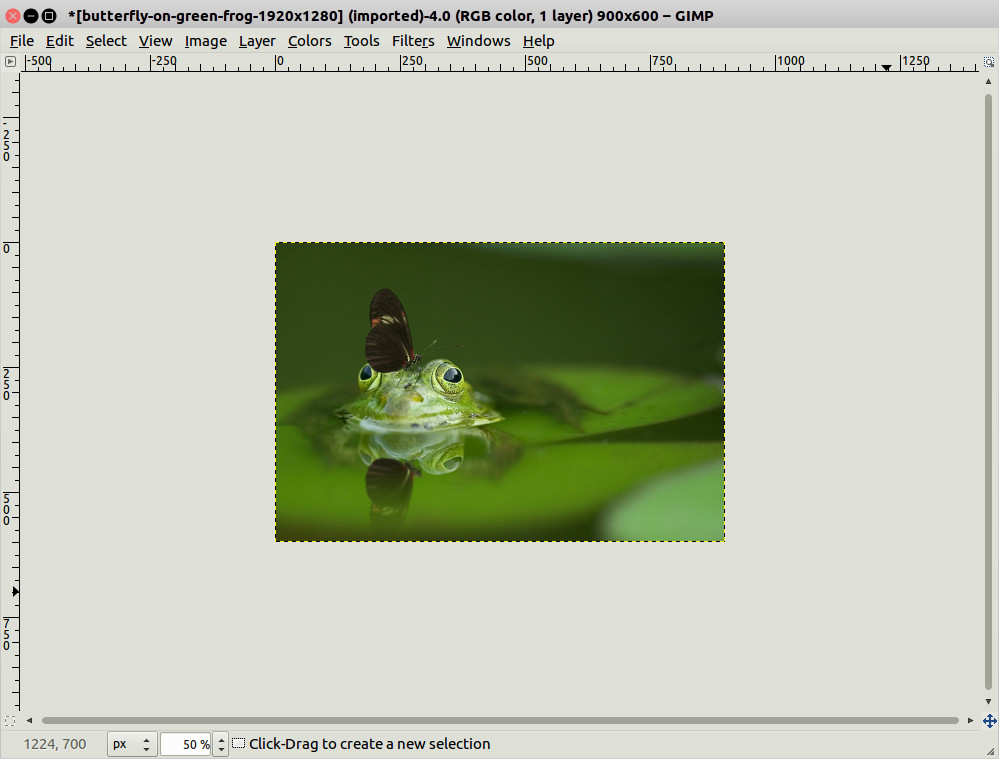
The following are a few screenshots from the Gimp so you can quickly find your way around that application. It’s powerful so it has many features and it can look scary the first time you use it:

Next, we want to use the Image menu and select Scale Image …
At that point, you see the Scale Image dialog with the current image sizes and resolution. You can ignore the resolution. Just change the width to 900.
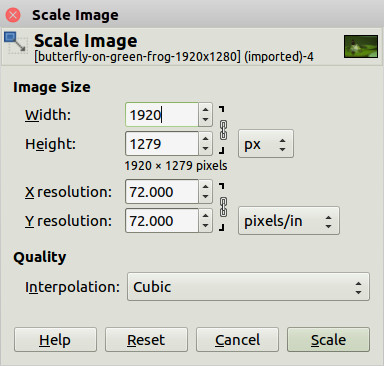
Once you click on Scale, the Gimp calculates the new image at the new size and displays it. Notice that they will not change the current scale (the zoom factor) so the image will shrink on the screen and may appear smallish. Hit 1 on your keyboard to get a 1:1 scaling factor (i.e. full resolution) and you will see how large the image will appear on your website.
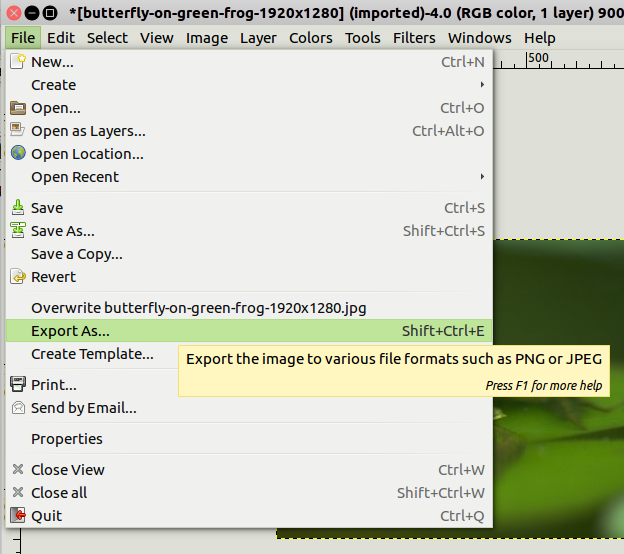
Now you can save this new version. Make sure to use File » Export As … for two reasons:
- The Save As … menu option saves an .xcf file which won’t work on the Internet
- The Overwrite <filename> … menu option overwrites your image and if you have the sizes in the filename, you are going to save the smaller image in the file with the large image sizes!
The file extension determines the file format when saving with the Gimp. For a picture, the .jpg extension is usually the best. For a drawing with flat colors (large areas with the same color), then PNG will be better. If you have the time, do save twice and then look at the resulting file size and use the smaller one in byte size on your Niche Website.
I won’t show you the actual Save Dialog, I would think that’s something you are sufficiently familiar with.
For JPEG, you are asked for the quality. A quality of 80% is enough for most picture and will give you a smaller file size. The default is around 90%, though, so you have to remember to reduce it each time you save a new image.
For PNG, the compression level should always be set at 9 (the maximum). There is really no reason to go any lower. It will be a tad bit slower, but I’d bet you could not tell the difference when compressing at 1 or 9 without using a computer to test how much time it takes. The other defaults are fine.
Modern WordPress and Image Sizes
I wanted to make you notice that the default WordPress environment and theme will automatically generate multiple images with various dimensions for you. It is possible to define those dimensions under Settings » Media.
When WordPress then generates the image tag (<img …>) it will reference those various pre-scaled images and your visitors’ browser can then choose which image to download. For example, if a smartphone has a screen width of 700 and you offer three sizes such as 1980, 900, and 500, the browser can choose to load the 900 pixel wide image and scale it down a little bit instead of taking the largest image (1980) and wasting a huge amount of data bandwidth.
Please verify that this works with your website before assuming that it does. It works in my case, it may not happen on your installation. Also, you still don’t want to upload images that are any larger than about 1,500 in width. It would otherwise really take forever for your visitors to download that image.
This works as is for images you upload in your pages. So far, I have not seen that feature being used by the Featured Image, which is problematic.
Caching (Advanced)
Another method to optimize is to cache your pages. You can even use a free service, such as CloudFlare, to get your pages cached and thus having a website that responds extremely quickly.
Now, trust me, until you get several hundred of thousands of people accessing your website, having such caching won’t help you much and it can be a nightmare to manage. Cache tend to save data for a long time (otherwise it’s really not that useful) and as a result, changes made to that data on your end won’t be made available to your users for a while longer. In most cases, it’s not a big deal (I have websites where I change some parameters and they take place over 1 or 2 months!) but if you wanted to show an important correction such as a phone number or an email address, it will be in your way.
A good idea is to work on your website and once it is 99% complete, bother with caching if you think it’s required. It can be a good experiment to do it early to make sure it works (instead of once you have 1 million visitors per day when you really do not want to mess up your Niche Website.)