

Or the minimum set of plugins to install on a brand new WordPress Niche Website
Now… you have a brand new WordPress website installed and you’re a bit overwhelm by all the features. Many buttons, menus, options to tweak, but how.
With version 2017, I think that most of the defaults are just fine and will work for you. I will talk about the few things that I think you want to change to make your website more user friendly as far as Niche Websites go. This includes having the blog on the front page, a contact page if you’d like to offer such (many Niche Websites don’t have a contact page. There is no one to contact, really, since all purchases are made on 3rd party websites.)
Very First Steps
Whenever WordPress gets installed on your hosting system, it will ask you various questions about your site such as the name and domain name. I would imagine that you’ll be fine with those.
It won’t be as easy to change the domain name, but I would imagine that you’re not going to look into doing that any time soon.
As for the name and slogan for the website, you can change them at any time by going to your Settings » General and editing the corresponding fields.
So these were the very first steps.
Administering a WordPress Website
If you are not currently logged in, you can go to the wp-admin page to do so. You do that by entering your domain name, a slash and that name. For example, for my website here, I would use this URL:
https://www.internetaffiliate.com/wp-admin/
At that point, it redirects me to the Login Screen and lets me enter my username and password.
Note that when you just installed a WordPress website, you are often automatically logged in from your installation steps. This is where it becomes tricky because at some point you get logged out and don’t know how to come back in. Now you know.
You can also go to the wp-login.php page if you prefer.
Changing Basic Settings
Once you are logged in your new WordPress website, you see a menu on the left side (at least in my Desktop version, I do).
I suggest you first go to the Settings » General to check out the basic options.
Most of the options are self explanatory. There are a few I want to talk about:
Membership
By default, the Membership option should be turned off. If not, I strongly advice that you consider turning it off. You do not want anyone else than you to have an account on your website. Later, once you start making money, you can consider hiring authors, an editor, etc. and that’s when you will create additional accounts. But your website will still not need to have a Registration form available by default. You can add users to your website without it.
Site Language
Make sure to select the correct language. This should be done before you start writing content.
Timezone
This is less important, although it is not a bad idea to use the correct timezone. By default, WordPress is usually set as UTC.
For Eastern Time, select America » New York.
For Central Standard Time, select America » Chicago.
For Mountain Standard Time, select America » Denver, except for Arizona which does not follow summer time, select America » Pheonix.
For Pacific Standard Time, select Amerca » Los Angeles.
For the Eastern part of Alaska, select America » Anchorage.
For Puerto Rico, you will see America » Puerto Rico, it is not Atlantic » San Juan.
Date Format
The default is likely okay. If you prefer a different format for your date, select one that you like. You can even tweak the format with your very own string.
The letters that you can use in the date format are defined along the PHP date() function.
Time Format
Just like the Date Format, you can change the letters to change how the time is going to be displayed. For example, I prefer the 24h rather than AM/PM syntax. That being said, this is not automatically what your readers will like, but it probably does not matter that much anyway.
As with the Date Format above, the letters that you can use in the time format are defined along the PHP date() function.
Week Starts On
Whether the week starts on Monday or another day. You can choose here. Some people like to use Sunday and others Friday. Up to you.
Changing Writing/Reading Settings
In most cases you do not want to change anything in the Writing settings.
There is a selection for Category: you should not create any categories. It’s a waste of time and it’s not Search Engine friendly (i.e. it creates many useless pages with lists of pages which most search engines will not index because they look weird. It could even have a negative effect.)
For security reason, you should not turn on the email system unless you are going to send email to your server to write content. I have no clue how that works and whether it does a good job at extracting your email content and creating a nice page with it. I never use that feature.
You can keep the email system turned off by keeping mail.example.com as the mail server URL.
The Reading settings, there you want to change the default homepage page with your latest posts. There is a checkbox at the top. Just make sure it says Your latest posts.
By default the number of posts shown on the front page will be 10. I think it’s a good number. You could also change it to show all your pages on the front page. That’s up to you.
Make sure that only the Summary is shown. Full Text means that the entire post is shown on the front page. That’s not what you want. People are expected to click on the link and go to the page if they’d like to read more about that one post.
There is one last option: Search Engine Visibility. Make sure it is turned off (not checked.) You want all search engines to see and index your website. When this flag is off, systems such as GoogleBot, are asked to ignore your website pages. This can be useful in some circumstances, such as when you just created a website and you wanted to work on it for a few weeks before making it live. However, since your website index takes time to be built in Google anyway, that would be rather useless. So unless you want to create some sort of invisible website, leave that one unchecked at all time.
Changing the Discussion Settings
The Discussion Settings are about Comments and contacting other websites about new content and modified content.
Attempt to notify any blogs linked to from the article—I have this one off. I do not really want to notify other blogs of anything.
Allow link notifications from other blogs (pingbacks and trackbacks) on new articles—this feature let you know when someone mentioned your blog post. As a result it posts the equivalent of a comment with a link toward that other website with your link. I personally turn that feature off because I think it’s not very productive nor useful to have such links. (It could even be detrimental.)
Allow people to post comments on new articles—In most cases, I think you can leave this one turned on. However, if you do not plan to pay any attention to comments, you may want to keep this turned off because if you do not attend to the existing comments, they will stop coming. So you could as well turn them off.
Frankly it’s easy to click “Spam” or “Trash” or “Accept” any time you get a new comment, and even answer if the comment warrants it (i.e. user asked a question you know how to answer, if they asked a question you do not know how to answer, you should also post something saying so—or better look for the answer and post that!) Interaction will show that you care and people will be pleased about that.
Note that by default you’re likely to have the Akismet plugin installed. This is to prevent spam. Instead, I think the “I’m not a Robot” is better because it allows your users to post without doing anything special (if they already answers the “I’m not a Robot” it won’t ask them to resolve the reCAPTCHA over and over again) and it’s free. I’ll talk about that further down as I list plugins I strongly suggest install on your WordPress website.
Also if your content generates questions, you can edit it and make it even better. This will kick Google in the rear and get it to reconsider increases that page rank if possible… So it’s a good thing to do such.
Comment author must fill out name and email—I usually keep this one checked, that way only people who are willing to share their name and email will post comments. This does not change anything in link with spam although it can help a little.
Users must be registered and logged in to comment—this one has to be turned off since we do not allow people to register an account. This is a good one to use to prevent people from posting comments.
Automatically close comments on articles older than X days—I suggest that you do not turn on that feature. I find that very annoying since after a while people cannot communicate with you about a specific post. Why would you want to prevent communication after just a few days?!
Enable threaded (nested) comments X levels deep—I turn that off. I think it is not a good idea to have a threaded communication on a post. This is just me so do as you wish on that one.
However, some people will cheat using the first comment and post a reply there to be at the top, even if you display the first comment first (it should be last, though). So be careful about that combo: Threaded + First Comment First.
Break comments into pages with X page displayed by default—personally, I like to see the last comment first before that way you can see the latest comment and not some really old probably insignificant message; as for the number of messages, it’s up to you, more means slower page load… keep that in mind. I don’t have pages with 50 comments, so I can’t say whether this is slow. On my Drupal websites, I tend to limit those to 20 or 25 instead. People don’t generally read that many comments anyway.
Comments should be displayed with the Oldest/Newest comments at the top of each page—this is the one option where I have to reverse the order. I think it is important to have the Newest first.
Anyone posts a comment—if you allow comments, this should be checked since you’re not allowing people to register an account.
A comment is held for moderation—by default you want comments to be held for moderation (next option) which means that you have a chance to read them once before it goes through. This way you really avoid any kind of spam. Now some people are very inventive and post really good comments that are spam but look like a valid comment. Just watch out before accepting comments. Click Trash if you’re not too sure and the comment does not add real value to your page.
Note that it is very important to avoid Spam in your comments because otherwise Google will remove your page(s) from its index. There is really no good reason to send users to a page with just a big pile of useless spam.
Comment must be manually approved—this is the option you want to turn on to make sure that you have a chance to approve the comment before it appears on your posts. All comments must be approved unless you get so many and have enough faith in your users. Frankly, it’s not too likely to happen at the start so I wouldn’t worry. It generally takes several month before you see your first comment appearing unless you publish all your posts on a site like Twitter and Facebook and have enough followers to get some click through (i.e. about 2% according to most of the people I’ve seen talking about Facebook pages and promoting on such.)
Comment author must have a previously approved comment—since you do not accept registration of users, this option is not really useful to you.
The other comment options are not useful if you are to moderate all comments anyway. So you can leave them empty.
Avatar Display—whether an avatar is shown next to the comments; WordPress uses the person’s email address to find the avatar, if it does not exist, then the Default Avatar defined below will be used instead.
I suggest the Gravatar Logo as the default Avatar because that way people can recognize that will work.
Maximum Rating—this is the website content rating. Hopefully you can use “G”. In case you are not familiar with this rating, read the comment next to the letter. G stands for General, PG stands for Parental Guidance, R is for Restricted, and X is violence or pornography.
As I mentioned above, your site should be G and possible PG (maybe because you have Heroic Fantasy content, you talk about witches or fairies, etc.) but R or X is just not as good for a Niche Website. I’m not saying it won’t work, just that it is likely going to be harder.
Okay, once you made all your selections, make sure to click the Save Changes button at the bottom of the page.
Changing Permalinks Settings
(Yes I skipped the Media settings, I don’t usually change those until after I installed the Easy FancyBox plugin)
In the Permalinks page, I want you to change the default selection to the following:
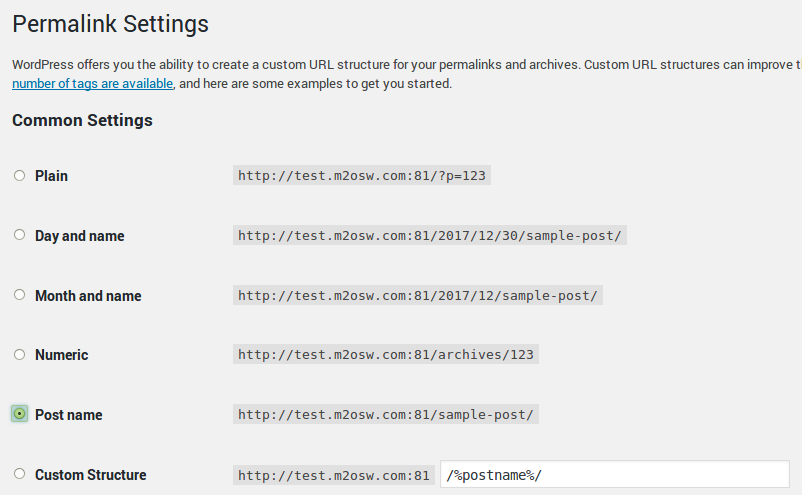
This is very important for various reasons. First of all, you do not want to put the date in the URL. That would mean you’d want to post all the time. The idea of a Niche Website is to write your content once and let it live. This means a post could be really old and yet still have tremendous value. Actually, the whole website should still be very useful as time passes if you plane properly because you want to post evergreen content. Content that doesn’t go out of date.
Also the path URL is part of your Search Engine Optimization (SEO). It is going to be used as keywords for that page. It’s particularly important not to use the ?p=123 type of URL.
If you had a more advanced website where you want to use the front page as a place to sell some product and you want a blog attached to that website, then in that case I would suggest you put the blog page under /blog/ and each post URL will go under /blog/… which means you want to change the Post name as follow:
Custom Structure: https://www.example.com /blog/%postname%/
Now, you should plan from the start whether you will use one of the other. For your first Niche Website, you want to skip on that until you do have a product. At the same time, changing the permalink later will have a dramatic effect to the indexed pages of your websites. It will continue to work, though, as long as you implement the necessary 301 (redirections) from the old path to the new path.
Below that are two boxes for Tags and Category paths. You can leave those alone since you do not want to have any categories or tags. As I mentioned above, there is no need for such at all. It won’t help you Niche Website. Real contents are long pages and not lists of pages. Your front page is enough as a list of pages, although you can add more if you’d like. For example, I have a page on this website with a list of pages you want to follow to create your first Niche Website. That way it makes it easier to follow (especially because my posts are not otherwise in order.)
Free Plugins You Want to Install on your Niche Website
Here is a list of the plugins I want you to install on your WordPress system. These will make your installation safer, more usable, SEO friendly, and more.
Plugin: All In One WP Security
This plugin, as its name implies, increases our website installation security. Once installed, you will get a new menu entry named WP Security.
User Accounts
Click on that menu entry and then go to WP Security » User Accounts.
If you chose “admin” as your user name, you’ll se that this section will tell you to change your user name immediately. However, for some odd reason, WordPress does not give you the ability to change your username. To do that, you can install the Username Changer plugin. Change your username, then uninstall since you do not need that extra plugin to stay installed forever.
There are the names that you cannot use because all of those are likely to be used by hackers to get access your website. They will automatically use those names and test with millions of passwords.
- admin
- administrator
- root
- example (assuming your URL is www.example.com)
- example.com (assuming your URL is www.example.com)
The idea is simple: there are two parts to a login, a username and a password. If the hacker knows the first part, the login username, then it has to detect only one other part: the password. It makes it a lot easier.
Actually, that list of names will be added to the list of names that should immediately be locked when an attempt to log in is done using them (see below).
There is another option here which is to click on the Display Name tab. If your display name is one to one the same as you login name, obviously, the hacker just has to go to one of your posts and retrieve that display name and voila they can attempt logins with their list of millions of passwords.
Note that somehow the WP Security Plugin considers that two names such as “alexis” and “Alexis” are different. The capital won’t help you since the login username is not case sensitive.
This is easy to change, just go to your profile and edit your display name. Remember that the idea is to prevent hackers from easily discovering your username and attempt to log in your account.
User Login
The WP Security » User Login page has a few tabs that you want to update.
Enable Login Lockdown Feature—check this box so you can prevent users from brute force login attempts
Allow Unlock Requests—I keep this one turned off, I don’t see any reason to allow someone I just blocked a way out of the block?!
Max Login Attempts—this should be 3, 4, or 5. No more than 5.
Login Retry Time Period (min)—if the Max Login Attempts happen within this period of time, then the IP gets blocked (actually, many IPs get locked. At least with IPv4, you get 256 IPs locked.)
Time Length of Lockout (min)—whenever an IP address gets locked, it will be locked for a long period of time. The default is actually fairly short. I strongly suggest that you lock the IP addresses for a very long time. I put 12000 in that value. This means over 7 days.
Display Generic Error Message—this is kept off, because there is no need to tell those idiots we are locking their IP address.
Instantly Lockout Invalid Usernames—this is the list I mentioned above, you want to add the names I already mentioned, these:
admin
administrator
root
example
example.com
The “example” and “example.com” are taken from your domain name. I guess hackers have discovered that some people would use such as their WordPress username.
Notify By Email—unless you have access to your Apache logs, this can be useful to see how many login attempts you get; know that if you have as many as my website, you’ll be getting hundreds of those; since you block those, it’s probably not too important, but I think it’s good to know once it starts.
Make sure to click the Save Settings buttons once done.
Firewall
The WP Security » Firewall is the next entry that is useful for your website.
This one has seven tabs, but only a few are really useful.
The Firewall feature modifies your .htaccess file. This is why I suggest you do this first. If it fails you can already start from scratch. You may also first save the .htaccess file with the tool (see WP Security » Settings » .htaccess File) and restore it later if you have problems. Although that being said, if it really generates very bad problems, you won’t be able to access your website from the interface. It just won’t work.
Firewall / Basic Firewall Rules
Enable Basic Firewall Protection—turn this one on
Completely Block Access To XMLRPC—unless you know what this is, check that one. It will prevent attempts from the outside to log in and access your posts using XMLRPC. This is an interesting feature, but it’s very often unused and yet WordPress does not offer a way to turn it On and Off. I strongly think it should be off by default and turned on only if you want to use the feature.
Disable Pingback Functionality From XMLRPC—this is not necessary if you completely block the XMLRPC. This will disable the pingback feature on your site. This is when someone posts a link to a page on your website and as a result you receive an even through XMLRPC and display a form of comment about the fact that someone mentioned your post.
Block Access to debug.log File—this is not super important since most of the time you’re not going to have the debug turned on. But really there is no reason for anyone to have access to your WordPress log file. So turn this one On.
Then click the Save Basic Firewall Settings button.
Firewall / Additional Firewall Rules
Disable Index Views—turn this on, it prevents Apache from showing directory contents. Your hosting company should already turn that off, but just in case, that’s double security that way.
Disable Trace and Track—turn this on, it prevents the TRACE and TRACK methods which are known to give away all sorts of information from Apache if allowed. I won’t enter in the details, just know that’s bad. It’s likely already turned off at your hosting company, but you wouldn’t want to guess whether that’s the case or not.
Forbid Proxy Comment Posting—turn this on, it prevents people from posting a comment if they access your website through a proxy. More or less when a use access your website through another website, the access will include the word Proxy. This flag will prevent all such accesses. People using a proxy are trying to hide their real IP address.
Deny Bad Query Strings—turn this on, it prevents attempts at generating various types of attacks to take control over your server. It is unlikely that they would work in the first place, but not even having to guess whether you were hacked this way is comforting, I think.
Enable Advanced Character String Filter—same as above, turn this one on.
Now click the Save Additional Firewall Settings button.
Firewall / 6G Blacklist Firewall Rules
Enable 6G Firewall Protection—turn this one On; you do not need both the 5G and 6G because the 6G includes all the 5G protections already.
Click the Save 5G/6G Firewall Settings button.
That’s it. You’re done with the WP Security settings.
For more about security (once you’re ready…) I also wrote Keeping Some Level of Security in Mind. If you would like to make sure that you have most if not all of these security points setup on your WordPress website, then in terms of security, it’s going to be top-notch for you!
Plugin: Contact Form 7
This plugin gives you the ability to create a form that can be filled by your users to send you a message. If you do not want to offer a contact form, skip this step. Most Niche Website do not include a contact form. You may want to check My Contact Form (Click your Back button once you are done.)
First, install the plugin. Then go to the settings. Once installed, you will see a new administration menu named Contact. That allows you to create a Contact form.
Click on Add New at the top of the page. The default form is usually all you need, except we want to add the reCaptcha. So it should look something like this, I show the reCaptcha addition in red, note that it won’t work until you actually install the reCaptcha we will go over a little later.
<label> Your Name (required)
  [text* your-name] </label>

<label> Your Email (required)
  [email* your-email] </label>

<label> Subject
  [text your-subject] </label>

<label> Your Message
  [textarea your-message] </label>

<label> You Robot? <span class="required-field">*</span>
  [recaptcha] </label>

[submit "Send"]
In most cases the default messages will do fine (see Messages tab?) although you may want to translate them if you’re creating a website in a language other than English.
Make sure to give the form a name and then click Save.
Now click on the Pages menu. In the list look for a page named Contact. When you hover over it, you see an Edit link. Click on it (you can also click on the title, it has the same effect.) The contact text can then be changed to something like this:
Fill out the following form and click Send to contact me via email.
Change the identifier with your contact form identifier. The short code actually shows up when you are on the Contact page. You probably don’t want to include the title, though.
Make sure to click the Update button once done.
Plugin: Display Posts Shortcode
The Shortcode plugin will help you transform short codes in some content. This is actually necessary to make the Contact form work, but not only that. You’ll want to have that plugin no matter what.
There are no settings. Just install and activate the plugin.
Plugin: Easy FancyBox
By default, when you add an image in a post, the image is shown and that’s it. You can change that default to make the image clickable so the user can see a larger version (At least on a Desktop computer). This is great, but by default that shows the large image instead of the page and going back requires the user to click on the back button. It’s not very user friendly.
With the Easy FancyBox, you get a popup that opens whenever a user clicks the image. However, you want to change a couple of settings.
This is when you go to the Settings » Media page.
Make sure that at least the Images checkbox is selected. For the popup, make sure Show the overlay around content opened in FancyBox, Close FancyBox when overlay is clicked and Show the (X) close button are selected too.
Further down you have an Images section with a Behavior selection. The Transition In and Transition Out selections should be set to None. Because you have what has to look like a simple site. Even if you want to show large versions of images in a fancy box.
Now click the Save Changes button.
Plugin: Google Analytics
Now you want to install the Google Analytics plugin. You’ll need to have a Google Analytics account. This is easy. If you don’t already have a gmail account, create one then go to https://analytics.google.com/ to create your Google Analytics account. It’s free.
This will give you a way to add a Property (your website) and that gives you an identifier which gets added to the Google Analytics settings.
After installing and activating the Google Analytics Plugin you see a Google Analytics on the side. Click on it and then click on Settings. That’s where you can enter your tracking ID or connect with your Google Account. By connecting you can choose the property that way, only it takes a little time between the moment you add your property to Google Analytics and the time you can select it here. However, by connecting your Google Account you will be able to look at your Analytics from your website. I personally prefer to just go to Google Analytics directly.
I strongly advice that you select the Administrator account as one not to track. Otherwise your accesses will be included and they should not because it will falsify your data. Once you have thousands of users, it won’t make much of a difference, but at first it’s nice to not have too many false positive.
Make sure to click Save Changes one done with your selection.
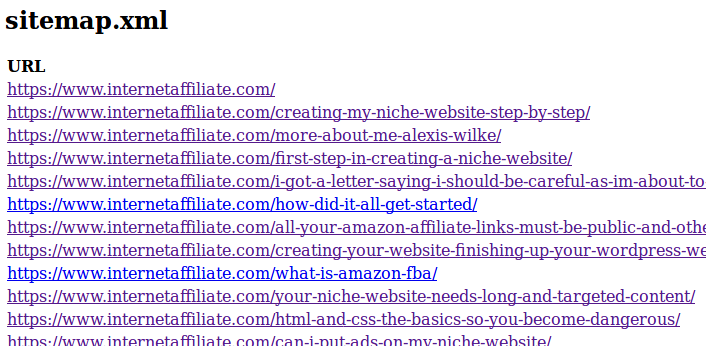
Plugin: XML Sitemaps
In order for all your pages to be found at once, you have to have an XML sitemap installed. It is not mandatory, but I’ve noticed that it helps the Google Search Console to index your website faster.
Just install and activate that plugin. It will automatically do the rest of the work for you. You can verify that there is a sitemap by going to your home page and then add sitemap.xml to the URL. It will load an XML file if it worked.
Plugin: Nofollow for external link
For your Search Engine Optimization, one important thing is to not have links to place that sell products from your page. Google frowns upon those. Big time.
This applies to all your affiliate links.
This plugin will automatically force the “nofollow” on all your external links. You can still offer some external links without the nofollow by adding the domain name to the settings (See Settings » NoFollow ExtLink).
This is mandatory because there is no way to add the nofollow on your links by default in a WordPress system (you can do it by hand by editing the HTML, not really practical!)
Plugin: Redirection
Another plugin that you just have to install and activate. It will do the rest for you automatically by default.
When you edit a page and change the title and want to use a new URL for it, the old page would return a 404. This is not good if someone had a link to that old URL. So a better way is to have a 301. This plugin automatically creates a 301 Redirect when you change your URLs.
You can also manually add new 301 Redirects. The plugin is somewhat limited and some pages won’t automatically get the necessary 301. If you know you’re changing a URL, test the page(s) after the change to make sure you have the 301. If no, go to the Tools » Redirection and add a redirection manually.
Plugin: Simple Google reCAPTCHA, a.k.a. “I’m not a Robot”
This last plugin is extremely useful to prevent spam. Much better than all the other solutions I’ve seen so far and its free (at least for your first 50 or so websites.)
You will need to create a property in the reCAPTCHA website. Again, this is a Google service so having a Gmail account is all you will need to be able to create your own reCAPTCHA settings.
After installation of the reCAPTCHA plugin a new menu is added under Settings, it allows you to enter your reCAPTCHA information. There is also a link there that takes you to the reCAPTCHA website so you can register your website there.
Now that you have your reCAPTCHA installed, you want to add it to your Contact Form if you installed that plugin. Select Contact » Integration to enter your reCAPTCHA info for the Contact Form settings. This is the final set to get the Contact Form working right. Now, if you go to your /contact/ page, you should see the complete form. Note that you probably will have to test in another browser to make sure it works. In your current browser, Google is not unlikely to know that you’re alright and it won’t show the “I’m not a robot” widget.